This application note uses the MAXQ2010 microcontroller's evaluation (EV) kit Rev D to implement a digital voltmeter. The article demonstrates how to measure the voltages with the ADC and display them on the EV kit's LCD. An onboard 5-way switch is used to select the ADC channel to be displayed on the LCD. No additional parts are needed aside from the EV kit.
<-- ======================================================================= --><-- CONTENT: DB HTML --><-- ======================================================================= -->Download an example project with the code described in this application note.
Introduction
The MAXQ2010-KIT showcases the
MAXQ2010 microcontroller. The kit has a versatile board with the following features:
- Two pushbuttons for reset and interrupt lines
- One 5-way switch
- 19 exposed GPIO pins
- Eight ADC channels
- A photocell
- A thermistor
- An LCD screen
Using these resources it is simple to build a digital voltmeter.
The MAXQ2010's integrated ADC accepts a voltage from 0V to 3.3V and translates it into a bit value from 0 to 4095 (12 bits of precision)
功率電感器. The microcontroller then scales the value to a range from 0 to 3.3000 and writes it on the board's LCD. The application code repetitively samples all eight ADC channels and uses the 5-way switch to determine which channel to display.
Aside from the EV kit, no additional parts are required. Included in the EV kit is a limited version of the IAR Embedded Workbench® software. The full version of the software can be purchased from the IAR™ website. The sample application was written and compiled on version 2.20I.
Getting started
Set up the board according to the EV kit documentation. You should also install jumpers J30 and J31, which will connect the photocell (R17) to ADC input 6 (AN6) and connect the thermistor (R20) to ADC input 7 (AN7). You can also add voltages on ports 0–5, as long as the voltages stay within the 0V to 3.3V range.
Next, run the IAR software. In the top left corner click File

Open
Workspace. Navigate to the directory containing the voltmeter project and open voltmeter.eww. The project settings will already be set up. To ensure that the JTAG is set to the correct COM port, right click on the bold-faced project name on the left side of the screen and select Options (
Figure 1). Go to Categories, click JTAG under Debugger, and enter the COM port to which your programmer is connected (
Figure 2). To check which COM port is being used, open Device Manager. The EV kit documentation details how to get there.
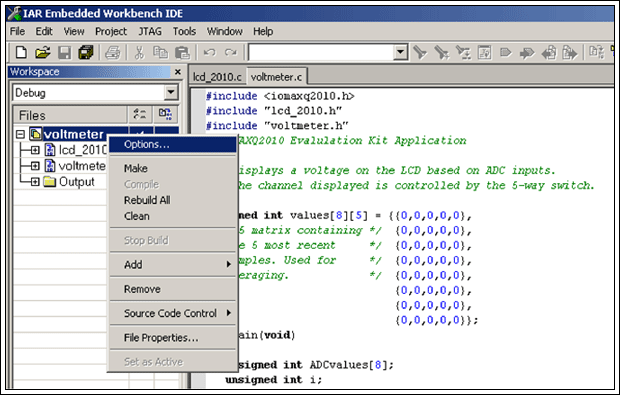 Figure 1. To verify that the JTAG is set to the correct COM port, start with the Options menu.
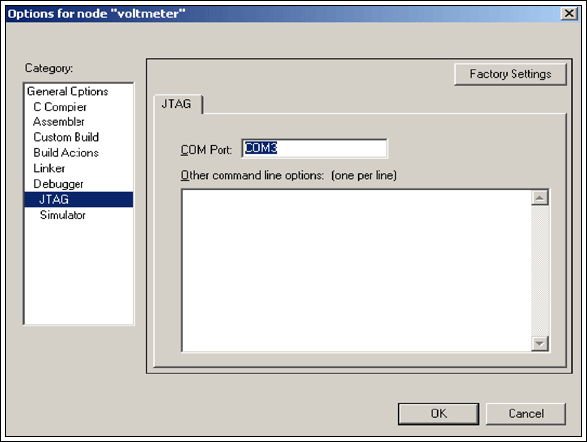 Figure 2. Find the JTAG option and enter the COM port to which your programmer is connected.
Next, click Debug on the far right side of the toolbar (
Figure 3). This will compile, link, and program your board. The debug menu will be brought up momentarily. A green arrow will be pointing to the main function. Run the program by pressing F5 or clicking the button on the toolbar that looks like a flat piece of paper with three arrows above it.
 Figure 3. Use the Debug command to compile, link, and program your EV kit board.
Application results
Featured on the EV kit board are two analog in電感廠家puts, the thermistor and photocell, which continuously output voltage signals. Both of these inputs are connected to ADC pins so their voltage can be measured. The sample application reads eight ADC values (on channels 0 through 7) at a time. The values are sent to a software lowpass filter that removes high-frequency noise. The selected ADC channel is displayed on the LCD. On the lower right-hand corner of the board is a switch. Pressing this switch down or to the right increments the ADC channel to be monitored. If t扁平型電感he channel selected is greater than s電感廠家even電腦電感器, the software selects channel zero instead. Conversely, pressing the switch up or to the left decreases the ADC channel; channel seven is monitored if the channel selected is less than zero. To display the current channel being monitored, press in the switch. To stop the ADC from sampling, hold the button SW3 down. While SW3 is held down, the channel can still be changed.
大功率電感廠家 |
大電流電感工廠
零成本讓你的電視盒子變身無線路由器 4月08日 第三屆·無線通信技術(shù)研討會(huì) 立即報(bào)名 12月04日 2015?第二屆中國IoT大會(huì) 精彩回顧 10月30日ETF?智能硬件開發(fā)技術(shù)培訓(xùn)會(huì) 精彩回顧 10月23日ETF?第三屆 消費(fèi)
功率電感:4040封裝尺寸的超薄、大電流電感器
推出業(yè)界首款翼式且采用4040封裝尺寸的超薄、大電流電感器IHLW-4040CF-11。IHLW-4040CF-11是為安裝在分離(cut-o電感器公司ut)PCB上而設(shè)計(jì)的,透過使用較大尺寸的部件
[逆變器]DC-DC電路(BOOST)設(shè)計(jì)分析【精解析】DC-DC升壓(BOOST)電路原理
BOOST升壓電路中:
電感的作用:是將電能和磁場能相互轉(zhuǎn)換的能量轉(zhuǎn)換器件,當(dāng)MOS開關(guān)管閉合后,電感將電能轉(zhuǎn)換為磁場能儲(chǔ)存起來,當(dāng)MOS斷開后電感將儲(chǔ)存的